
Are you paying enough attention to your bike? Do you usually review it before leaving or when you arrive from your routes or leave that task to your trusted workshop? The mongoose red mountain bike is easy to maintain properly.
You do not have to put on your overalls and arm yourself to the teeth of tools. Instead, we simply want to share with you 10 simple things you can do at home so that your mountain bike works perfectly and you can be sure that everything is in order.
1. Keep your bike clean
While it is true that it is not necessary to wash the bike after each ride, it is a good idea to remove dust from the suspension bars and the dropper post. If the seals are in good condition, they will prevent particles from getting inside. It is a simple task, which costs nothing and lengthens their life. If you are pickier, there are specific products that hydrate retainers after cleaning.
The ideal thing to do a general cleaning would be a hose with a water jet with enough pressure to remove mud or dirt. However, the normal thing is not to have something like this so that you can go to service stations with car wash points. If you use pressurized water, be careful to take some distance. By having too much pressure, you have to take care of the areas of the bottom bracket, wheel axles, and suspensions, as you could cause water to enter in places where there should be no humidity, and corrosion or malfunction could occur.
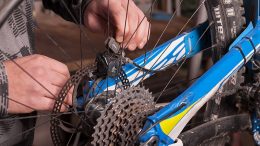
Cassette cleaning
As for the transmission and chain, keeping them as clean as possible lengthens their life and makes them more efficient. Make sure that a mass of grease, dirt, sand, or dust does not accumulate. In that case, you should use specific degreasing products and you can help yourself with brushes and old cloth. Do not forget after lubricating again (checkpoint 5 to know how to do it).
The brake discs and pads can become contaminated by a drop of grease that has escaped. If they don’t stop you, an old (and cheap) trick is to take it all apart, leave it in alcohol, and burn it later.
Some people put the bike in the shower and clean it with great care, using sponges and soaps or specific products. In that case, use hot water. It will help dissolve the fat better.
2. Check the hardware and tightening
Tightening screws is important to enjoy a safe exit. You would not be the first or the last person to have a mishap because a part of the bike has come loose. It’s such a simple thing to do, but one that many people don’t pay enough attention to.
The ideal would be to have a torque wrench to give the tightening torque according to the manufacturer’s manual. However, if your bike is not carbon, you do not run as much risk by tightening “by eye” with the appropriate Allen or Torx wrench for each bolt.
3. Check the pressure and wear of your tires
It sounds silly, but the wheels are “bike shoes,” and they must be in good condition. Going out on your route with new tires or one in which the studs disintegrate when gripping them with your fingers will undoubtedly make a difference. Studs in excellent condition will offer you the necessary grip in curves and the most difficult areas, as long as you also consider the wheels’ inflation pressure.
Mountain cover in bad condition
With too high pressure to face a trail bike, you will hardly notice any damping for a lot of full-suspension bikes you ride and it will give you little confidence and security. On the other hand, too low pressure will weigh you down during a climb and help you undercut corners or puncture more easily. Without a doubt, it is necessary to adapt the pressure to the requirement of the route you face.
4. Maintain good lubrication
Every time we clean the bike it is convenient to dry it well and lubricate all the necessary points. To lubricate the chain, rotate the cranks while applying the oil. It would be ideal if you can help yourself to a bicycle stand and change the gears to go through all the transmission speeds.
Chain lubrication
Applying a drop of chain oil to the seat post retainer and all moving points (especially if you hear creaking).
It is also advisable to grease the steering when you release it to clean it, or the hubs’ bottom bracket and bearings. Perhaps you need a little more knowledge, specific tools, and familiarity with maintenance for this last point. Take it to your trusted workshop when you need it.
5. Measure chain and transmission wear
If you have been careful not to let a thick layer of grease and dirt build up on the transmission, you are likely to experience less wear and tear and delay the time of having to change the chainring, cassette, and chain. However, depending on all the hours of use you have given it, the chain may have stretched due to the bolts wearing out and giving themselves away.
Measuring chain wear
Check it from time to time. It will save you from having to change the entire transmission. For this, there are specific tools. If you don’t have it, what you can do is measure several links with the chain in tension. Multiply the length of one (usually ½ inch = 12.7 mm) by the amount you have chosen, and check when measuring the entire chain that it does not exceed 1% stretch. If it does, think about changing it.
6. Fill your tubeless sealant and repair your tubes
Unfortunately, although tubeless is a great tool to seal your punctures on the road, the liquid over time loses properties. In addition to that, if you have had to plug several holes, there is likely hardly any left. You should refill your wheels every 3 months, obviously taking the use you give your bike. If you have had it stopped for a long time, it does not hurt to take a look to see if it has dried and even replace the liquid.
Many products include a small tube to make the process more comfortable from the valve and not have to remove the cover.
Filling the tubeless sealant
If you haven’t switched to tubeless yet, it’s a good idea to check your used cameras. In the mountains, we don’t usually stop fixing them and leave that task at home. Check one by one and patch where you find an air leak. Fold them up, tie them with a rubber band and they are ready for the next adventure.
7. Make sure cables and covers are in good condition
When you see that the dropper post does not retract or does not come out, or that it is difficult for you to change gears, it may be that dirt has gotten into the cable sheaths (this can also happen to your brakes if they are mechanical).
Brake cable lubrication
Although it would be better not to wait for that to happen and take the precaution of cleaning it from time to time, not everyone has pressurized air in their home to do it. Taking the cables out of their covers and blowing, we will clean the housing. If air pressure is not available, buy a new cable with its sheath and replace the old one. Do not forget to add a few drops of lubricant. It will soften the friction. It is a simple task that anyone can do at home. However, go to your trusted workshop if you have doubts.
8. Check the good condition of the spokes (spokes)
Checking from time to time that the radios are in good condition is a quick and easy gesture that costs nothing. Enduro routes are often demanding, and if you move over very technical terrain or jump, the spokes sometimes loosen or even break. Being sure that your wheels are perfectly fit makes you enjoy your route 100%.
9. Monitor brake pad wear
Think how many times you can brake on an enduro route. Although a loss of efficiency or squeaking sounds usually makes you realize that something is wrong, it is a good idea to look from time to time to see how much wear your pads have.
That the brake pistons show, quite a bit is a good clue. However, it doesn’t take long to ensure since all you have to do is loosen a small screw. If there is less than 1 mm left, buy new ones, you can endanger your physical integrity and damage the brake disc.
Worn and new brake pads
Sometimes the pads laminate and lose efficiency. You can solve this by running them through sandpaper.
The useful life of the discs is not eternal either, but depending on the use you give them, climate, pad material, cleaning, it can last more or less. If you notice wear in the area where the pads touch, you should check the thickness with a gauge and think about changing it if it has reached the minimum required.
10. Bleed your brakes regularly
Depending on the use you give your bike and the brand (of brakes), the brake oil system will require maintenance to a greater or lesser extent and bleeding will be more or less easy. There are cases in which the system requires that the circuit be filled with a little more oil simply by placing new pads.
Brake bleed
To make this point, you need some specific material. Find out well and look for the manual to carry out the purge and be able to do it step by step. Suppose it seems like a lot of trouble if you do not want to invest in materials that you do not consider essential or simply do not have time for it, take the bike to the workshop when you notice that your brake lever is too close to the grip even after adjusting the adjustment.
In conclusion,
Maintaining your mountain bike is essential for its longevity and performance. While there are many ways to take care of your bike, we recommend taking a look at the article above and utilizing the 10 tips mentioned in order to keep your bike in top shape.