
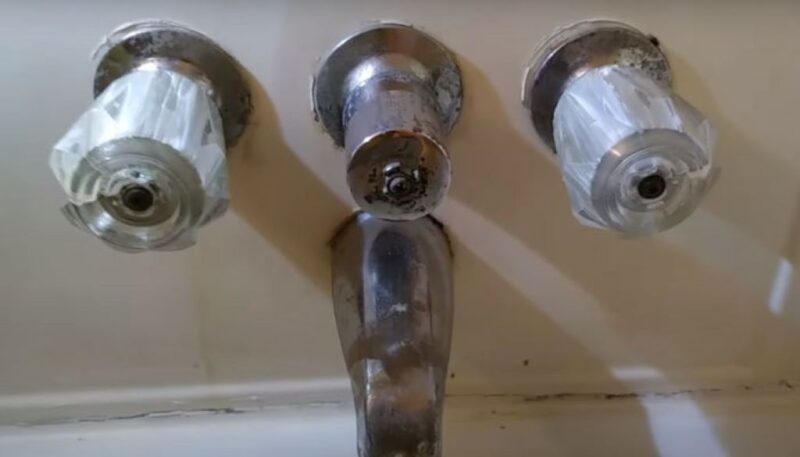
A stripped bathtub faucet handle can be incredibly frustrating. You go to turn on the water, only to find the handle spinning uselessly in place. No matter how hard you try, you just can’t seem to get a grip on it. While a slippery handle may seem like a minor annoyance, it’s often a sign of a much bigger problem. The screw holding the handle in place has likely become loose over time. This allows water to seep in and cause corrosion. As the corrosion worsens, you’ll find the handle gets looser and looser.
If left unaddressed, a stripped handle can quickly turn into a leaky, sputtering faucet. The constant drip of water is not only annoying but leads to wasted water and higher utility bills. Replacing the handle should be at the top of your to-do list.
The good news is, you don’t have to be a plumber to tackle this repair yourself. With a few basic tools and some patience, you can remove the old handle and install a shiny new one. This straightforward project can be accomplished in the afternoon.
Ready to get a grip on things? Let’s go over everything you need to know to replace a stripped bathtub faucet handle.
Assessing the Damage
Before rushing into repairs, take a moment to properly diagnose the problem. Start by removing the decorative cap on the handle (if your faucet has one) and examining the screw underneath. Chances are you’ll see some clear signs of trouble:
- Rust or corrosion around the screw
- Water damage or mineral deposits on the faucet body
- The screw head may be stripped or malformed
Spin the handle around and check for any looseness or wiggle room. If you can easily turn the handle without it catching and shutting off the water, the interior spline (the piece that attaches the handle to the valve/stem) is likely stripped as well.
While you’re inspecting things, go ahead and turn the water on and off a few times. Listen closely for any drips or leaks coming from the faucet spout. Small drips indicate worn washers or seals inside the faucet assembly. These will need to be replaced at the same time you swap out the handle.
By thoroughly examining the faucet inside and out, you can identify all the necessary repairs upfront. This prevents you from having to take things apart multiple times. Discover also how to replace bathtub faucet handles.
Gathering Your Replacement Faucet Handle Supplies
Before you can remove the old handle, you need to purchase a replacement. Start by looking underneath your faucet for the manufacturer’s name and model number. With this information in hand, you can find the exact replacement part you need. Hardware stores, home centers, plumbing supply shops, and online retailers all carry replacement handles for most name-brand faucets.
In addition to the new handle, you may also need to pick up the following supplies:
- New faucet handle screw. The original is likely corroded or stripped. Don’t try to reuse it.
- Spline adapter. This small plastic piece fits inside the handle and allows it to control the water flow.
- Seats, springs, and washers. If the faucet leaks, you’ll need to replace the worn internal parts during handle replacement.
- Teflon tape. Used to wrap threaded connections to prevent leaks.
- Faucet grease. Lubricates washers and seals for smooth faucet operation.
- Plumber’s putty. Seals the handle base to the outside of the faucet.
Before you can remove the old handle, you need to shut off the water supply lines. This prevents water from spurting out when you disassemble the faucet. Locate the shut-off valves underneath the sink and turn them clockwise until they stop. Turn on the faucet briefly to drain out any residual water in the pipes.
Now you’re ready to get to work!
Removing the Old Stripped Faucet Handle
With the water supply off, start removing components:
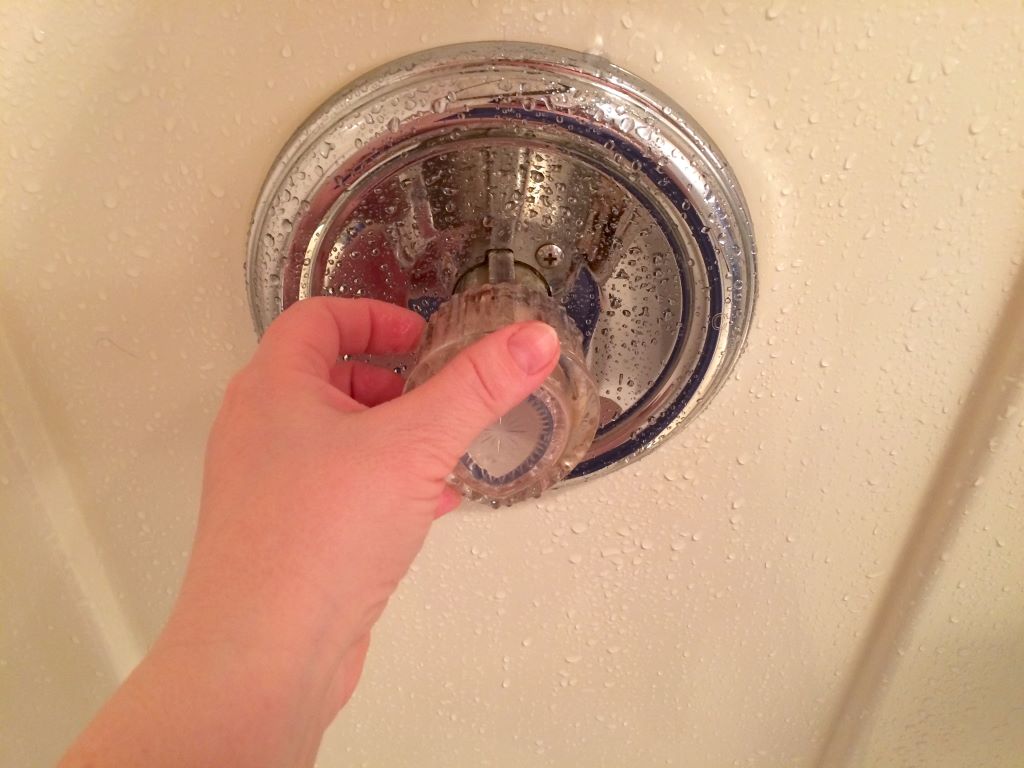
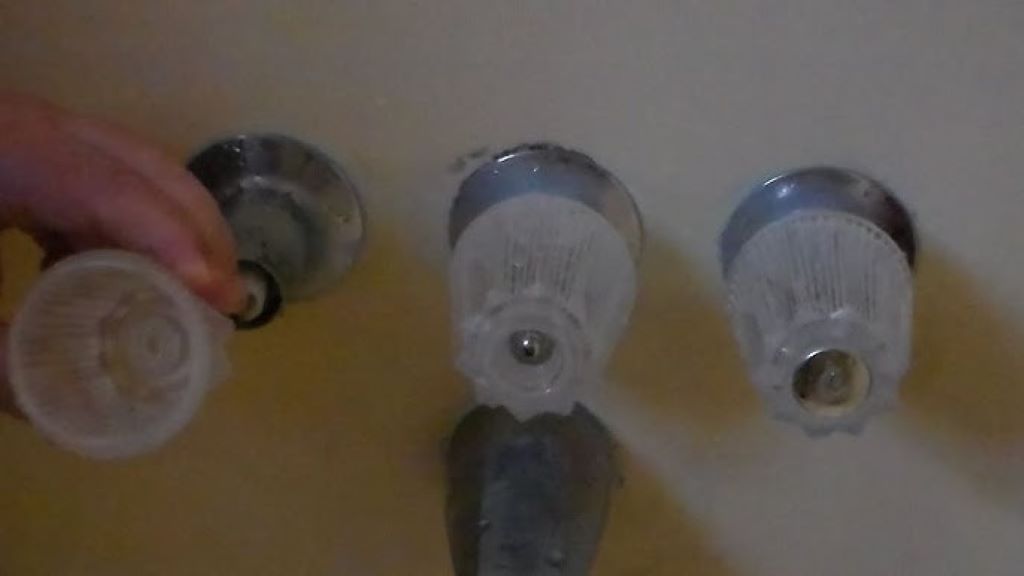
- Pry off the index cap – This plastic cap covers the screw you need to remove. Slide a small flat screwdriver under the edge of the cap and gently pry it off.
- Unscrew and remove handle screw – Use a Phillips or flat head screwdriver to remove the screw securing the handle. Pull the screw out by hand once loosened.
- Wiggle the handle free – Twist the handle back and forth while pulling outward. It should slide off the faucet splines. Take care not to damage the interior spline adapter you need to reuse.
- Use pliers if stuck – Sometimes mineral deposits fuse the handle in place. If it won’t budge, grip tightly with locking pliers or a wrench to break it free. Protect the finish with a rag.
- Remove faucet cap and collar – The decorative cap should lift off easily after the handle is removed. Then locate the retainer nut or collar around the valve stem and unthread it counterclockwise.
- Inspect parts for damage – Examine the interior spline adapter and valve stem for corrosion. Note any parts that need replacement. Also inspect the faucet body for cracks or leaks.
With the handle removed, you can now continue to the valve itself. Removing it provides access to any seat washers, springs, or seals that need replacement within the faucet body. Refer to your manufacturer’s instructions for model-specific disassembly.
Replacing Internal Faucet Parts
If your faucet drips or leaks, replace the worn rubber seals and plastic valve seats while you have it disassembled. This prevents continued leaks that lead to corrosion and water damage down the road.
Here are the steps for replacing common wear-and-tear parts inside a bathtub faucet:
- Unscrew the valve retainer screw – This holds the valve cartridge or stem assembly in place. Some models have a retainer clip instead.
- Remove valve cartridge – Pull the valve/stem unit straight out with pliers once the retainer is removed.
- Replace rubber seats and springs – These sleeves and plastic washers fit around the valve stems. Cover new rubber parts with faucet grease before installing.
- Inspect valve cartridge – Look for cracks, pitting, or scaling. Replace if worn.
- Wrap threads with Teflon tape – This prevents leaks between threaded parts. Wrap in the direction of the threads.
- Reinstall valve cartridge – Grease and reinsert into faucet body. Secure with the retainer.
With fresh seals and washers installed, your faucet will function like new again. Just a few more steps to go until you can enjoy leak-free water flow!
Installing the New Tub Faucet Handle
You’re in the home stretch! Follow these steps to properly install your shiny new faucet handle:
- Apply plumber’s putty – Roll some putty between your palms into a “rope” and press it around the base of the faucet handle. This seals it when you tighten it down.
- Insert spline adapter – Grease the plastic adapter and slide it into the handle opening as directed by the manufacturer. It clicks into place.
- Align splines and tighten – The spline adapter meshes with the grooves in the valve stem. Align them correctly as you slide on and tighten the handle.
- Tighten set screw – Thread in the replacement handle screw by hand until snug. Finish tightening with a screwdriver but take care not to over-tighten.
- Test motion – Turn the handle on and off a few times to ensure proper alignment and range of motion.
- Replace the index cap – Snap the plastic cap back into place over the handle screw. This finishes off the repair and hides the screw head.
Almost done! The last step is to turn the water supply back on and test for leaks. If all is dry, you can now finally enjoy your refreshed bathtub faucet.
Troubleshooting Common Problems
Even when carefully following all the steps, you may encounter a few hiccups during your faucet handle replacement project. Here are some quick troubleshooting tips for common problems:
- Handle turns but water doesn’t shut off completely – The faucet stem may need to be adjusted or replaced. Ensure it is tight and properly aligned.
- New handle feels stiff and squeaks – Apply more faucet grease to the rubber valve seats and o-rings.
- Handle loosens over time – Be sure to tighten the handle screw fully. Also replace the screw if stripped.
- Leak between handle and faucet body – Add more plumber’s putty or wrap the threads with Teflon tape to prevent leaks.
- Water leaks from around the valve stem – Typically indicates damaged or missing o-rings. Replace o-rings and reinstall valve properly.
Don’t be afraid to take things apart again if you encounter any post-repair drips or leaks. Properly sealing all connections prevents much larger headaches down the road.
FAQs
1. Is it possible to fix a stripped faucet handle without replacing it?
In most cases, attempting to repair a stripped handle is only a temporary fix. The underlying issue is metal corrosion or mineral build-up fusing parts together. This inevitably gets worse over time. Replacing both the screw and handle ensures a solid, leak-free repair.
2. What tools do I need to replace a bathtub faucet handle?
You likely already have the basic tools needed: adjustable wrenches, locking pliers, flat and Phillips screwdrivers, Teflon tape, and a container of plumber’s putty. A basin wrench helps remove nuts in tight spaces. Always turn off the main water lines before starting.
3. Can I replace just the screw or spline adapter?
It’s best to replace the entire handle, screw, and internal adapter together. The spline is designed to fit that specific model handle. Mixing manufacturers or old and new parts often leads to problems. Invest in a full handle kit for a trouble-free repair.
4. What should I look for when buying a replacement handle?
Always try to match the original handle style and finish. Check that replacement handle kits include all necessary pieces like screws and spline adapters. Look for durable metal handles rather than plastic. Handles for tub/showers have special pressure-balancing valves.
5. Why does my bathtub faucet drip after replacing the handle?
Most post-replacement drips are caused by worn internal seals or improper installation. Make sure to replace all o-rings and valve seats. Carefully follow directions for proper alignment and tightening. Adding plumber’s putty and Teflon tape prevents leaks.
In Conclusion
While a stripped faucet handle can be frustrating to use, the repair process is straightforward. With some basic tools and replacement parts, you can tackle this project yourself in a few hours. Carefully removing the old corroded handle, fixing internal leaks, and installing a new handle will restore full function. Just take your time and follow each step closely. Before long, you’ll be enjoying a refreshed, leak-free bathtub faucet.