

Indoor cycling has become increasingly popular among fitness enthusiasts who want to maintain their training routine regardless of weather conditions. For those working with limited space, setting up a proper cycling workout setup presents unique challenges. Rollers offer an excellent solution for small home gyms, providing an effective training experience without requiring excessive room.
Many cyclists face the dilemma of choosing between different indoor training options. Understanding how to maximize your limited space while creating an efficient training environment can transform your home workouts. This comprehensive guide will walk you through every aspect of setting up indoor cycling rollers in a compact area.
Understanding Indoor Cycling Rollers
Rollers consist of three cylindrical drums mounted on a frame. Your bike sits on top of these drums, with the front wheel on one roller and the rear wheel on two connected rollers. As you pedal, the drums rotate beneath your wheels, creating a riding experience that closely mimics outdoor cycling.
Unlike stationary trainers that hold your bike in place, rollers require you to balance while riding. This characteristic makes them excellent for developing bike handling skills and core strength. However, it also means they demand more attention and practice to master.
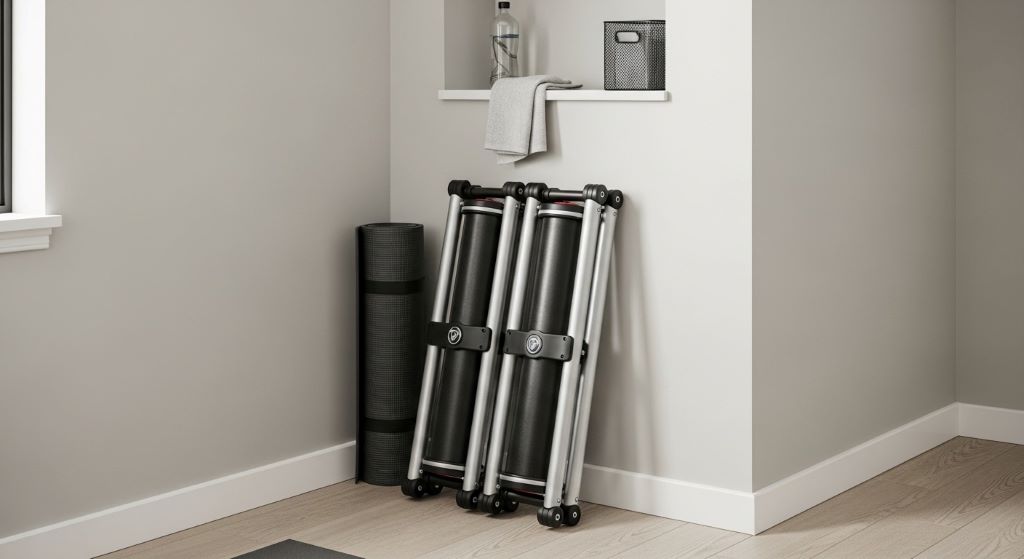
The compact design of rollers makes them ideal for small spaces. Most models fold up when not in use and can be stored under a bed or in a closet. Additionally, they’re generally lighter than other indoor training equipment, making them easy to move around your home.
Evaluating Your Available Space
Before purchasing rollers, carefully measure your workout area. You’ll need enough length to accommodate your bike and the roller frame, plus a bit of extra space at each end for safety. Most roller setups require about six to seven feet of length.
Width is equally important. You should have at least three feet of clear space on either side of your bike. This buffer zone gives you room to dismount safely and prevents you from hitting walls if you wobble while learning to ride rollers.
Ceiling height matters if you’re tall or prefer standing while cycling. Measure from the floor to the ceiling and account for your height on the bike. Most people need at least seven and a half feet of clearance to ride comfortably.
Consider the flooring in your chosen space. Hard surfaces like concrete or tile work best for stability. Carpet can cause rollers to sink or shift during intense efforts. If you must use carpeted areas, place a sturdy platform or mat underneath your setup.
Comparing Different Indoor Training Options
When deciding on equipment for your home gym, understanding the differences between various training devices helps you make an informed choice. The roller trainer vs turbo trainer debate centers on several key factors that affect your training experience.
Turbo trainers, also called wheel-on or direct-drive trainers, secure your bike in a fixed position. They’re easier to use because you don’t need to balance. Many models offer electronic resistance control and connect to training apps. However, they’re typically bulkier, heavier, and more expensive than rollers.
Rollers provide a more realistic riding feel because you must balance and steer. They improve bike handling skills naturally through regular use. Moreover, they’re quieter than many turbo trainers and require less maintenance. The portability and compact storage of rollers make them particularly suitable for small spaces.
The learning curve for rollers is steeper initially. Most people need several sessions to feel comfortable riding without support. Nevertheless, this challenge becomes an advantage as it engages your core and improves overall cycling technique.
Selecting the Right Rollers for Your Space
Various roller models cater to different needs and space constraints. Standard rollers work for most cyclists and fold relatively flat for storage. They typically measure about 18 inches wide and six feet long when set up.
Adjustable rollers accommodate different wheelbase lengths. This feature is useful if multiple people with different bike sizes will use the same rollers. They add minimal bulk while providing versatility.
Some models include a resistance unit that increases the workout intensity. While this addition makes the rollers slightly heavier, it still maintains their space-saving advantage over turbo trainers. Resistance units help simulate hills and provide more challenging workouts.
Parabolic or curved rollers offer increased stability by naturally centering your bike. They’re wider than standard rollers but still more compact than most turbo trainers. Beginners often find them easier to learn on.
Fork stands provide support for your front wheel during the learning phase. These small attachments don’t significantly increase the space requirements. You can remove them once you’ve developed confidence and balance.
Preparing Your Training Area
Once you’ve chosen your rollers, preparing the space properly ensures safe and effective workouts. Start by clearing the area of any obstacles. Remove furniture, decorative items, and anything you might hit if you lose balance.
Place a training mat under your rollers. This protects your floor from sweat and reduces noise transmission to rooms below. Quality mats also prevent the rollers from sliding during intense efforts. Look for mats specifically designed for indoor cycling, as they’re durable and easy to clean.
Adequate ventilation is crucial for indoor training. Cycling indoors generates significant heat, and poor airflow makes workouts uncomfortable. Position a fan to blow directly on you from the front. Some cyclists use multiple fans to create crosswinds that enhance cooling.
Lighting should be sufficient to see clearly but not harsh or glaring. Natural light from windows works well during daytime sessions. For evening workouts, adjustable lighting lets you create the right ambiance while maintaining visibility.
Consider installing a mirror on the wall facing your setup. This allows you to monitor your form and pedaling technique. Additionally, mirrors make small spaces feel larger and more open.
Setting Up Your Cycling Workout Setup
Begin by positioning your rollers in the designated space. Ensure they’re on a level surface to prevent rolling or shifting. Unfold the frame and secure any locking mechanisms according to the manufacturer’s instructions.
Adjust the roller spacing to match your bike’s wheelbase. The front roller should support your front wheel’s center, while the rear rollers should align with your rear axle. Most rollers have measurement marks to help with this adjustment.
Place your bike on the rollers carefully. Start by positioning the rear wheel between the two back rollers. Then lower the front wheel onto the front roller. The bike should sit naturally without leaning to either side.
Check that both wheels spin freely without rubbing against the roller frame. Inflate your tires to the recommended pressure. Slightly higher pressure than you’d use outdoors often works better on rollers because it reduces rolling resistance.
Set up a support system for your first few sessions. Position your rollers next to a wall, doorframe, or sturdy furniture that you can grab if needed. Having this safety net nearby builds confidence while you’re learning.
Creating an Effective Training Environment
Your training environment significantly impacts workout quality and motivation. Entertainment options help pass time during longer sessions. Mount a tablet or position a television where you can see it comfortably while riding.
Many cyclists use training apps that provide structured workouts or virtual riding experiences. These platforms connect via sensors that track your speed and cadence. However, basic rollers without electronic connectivity still pair with phone-mounted apps that use your device’s sensors.
Keep water bottles within easy reach. Hydration stations can be as simple as a small table or shelf positioned beside your setup. Include towels for wiping sweat to prevent it from dripping onto your equipment or floor.
Music can enhance motivation during intense intervals. Wireless speakers eliminate cable clutter in your small space. Create playlists that match different workout intensities to help pace your efforts.
Temperature control affects workout comfort significantly. Besides fans, consider the room’s ambient temperature. Slightly cooler temperatures feel better once you start generating heat through exercise.
Mastering the Technique
Learning to ride rollers requires patience and practice. Start by mounting the bike while holding onto your support point. Clip into your pedals if you use them, or place your feet on the pedals if using flat pedals.
Begin pedaling smoothly at a moderate cadence. Look forward, not down at your wheels. Your natural balance mechanisms work better when you focus on a point ahead rather than watching the ground.
Keep your upper body relaxed. Tension in your shoulders and arms makes balancing harder. Let your hips move naturally with your pedaling motion. This fluid movement helps maintain equilibrium on the rollers.
Practice different cadences once you’re comfortable with basic riding. Faster cadences around 90 to 100 RPM often feel more stable than slower ones. The gyroscopic effect of spinning wheels helps keep you upright.
Gradually reduce your reliance on the support point. Try riding with just fingertips touching, then hands hovering nearby, and finally hands on the handlebars. Most people achieve unsupported riding within three to five sessions.
Maximizing Your Limited Space
Small home gyms require creative solutions to fit everything you need. Vertical storage keeps rollers out of the way between workouts. Wall-mounted hooks or brackets can hold the folded frame off the floor.
Multi-purpose furniture serves double duty in compact spaces. A storage bench can hold cycling accessories while providing seating. Foldable tables work for holding devices and water during workouts, then collapse for storage afterward.
Consider using your training space for other activities when not cycling. Yoga mats roll up easily, and resistance bands store in small containers. This flexibility maximizes the value of every square foot in your home gym.
Organize cycling gear efficiently. Shoe racks, helmet hooks, and jersey hangers keep everything accessible without cluttering your training area. Clear storage bins let you see contents at a glance while protecting items from dust.
Noise management becomes important in small homes or apartments. Rollers are naturally quieter than many alternatives. Nevertheless, additional sound dampening through mats and properly inflated tires minimizes disturbance to others.
Maintaining Your Equipment
Regular maintenance keeps your rollers functioning smoothly and extends their lifespan. After each use, wipe down the drums to remove any rubber residue from your tires. This prevents buildup that can affect performance.
Check the tension of the drive belt connecting the rear rollers monthly. Proper tension ensures smooth operation and prevents premature wear. Most manufacturers provide specifications for correct tension.
Inspect the frame and welds periodically for signs of stress or damage. Address any issues immediately to prevent failure during use. Tighten any bolts or fasteners that may have loosened over time.
Lubricate moving parts according to the manufacturer’s recommendations. Proper lubrication reduces friction and noise while preventing rust. Use appropriate lubricants designed for the specific materials in your rollers.
Store your rollers in a dry location when not in use. Moisture can cause rust and deteriorate components. If you must store them in a garage or basement, use a protective cover.
Developing a Training Routine
Consistency produces results in any fitness program. Schedule specific times for roller workouts just as you would outdoor rides. Treating these sessions as important appointments increases adherence.
Start with shorter sessions of 20 to 30 minutes. Gradually increase duration as your fitness improves and you become more comfortable on the rollers. Quality matters more than quantity, especially in the beginning.
Vary your workouts to prevent boredom and promote different fitness adaptations. Include steady-state endurance rides, high-intensity intervals, and recovery spins throughout your weekly schedule.
Warm up properly before intense efforts. Spend five to ten minutes pedaling at an easy pace to prepare your muscles and cardiovascular system. Similarly, cool down after hard workouts to aid recovery.
Track your progress using a training log or app. Recording workout details helps identify patterns and measure improvement over time. This data also prevents overtraining by showing when you need rest.
Safety Considerations
Safety should always be a priority when using rollers. Never ride while impaired or extremely fatigued. Losing concentration can lead to falls and injuries.
Keep your training area free from trip hazards. Secure any cables from fans or devices along walls or under mats. Pets and small children should stay clear of your training space during workouts.
Learn to dismount safely. Practice unclipping or removing your feet from pedals while coasting. Grab your support point before coming to a complete stop. This controlled dismount prevents falls.
Use appropriate cycling shoes that fit your pedal system correctly. Loose or improperly fitted shoes increase the risk of foot slippage. This can cause you to lose balance or injure your foot.
Listen to your body during workouts. Stop immediately if you experience dizziness, chest pain, or unusual shortness of breath. Indoor training can be demanding, and recognizing warning signs is important.
Enhancing Your Training Experience
Additional accessories can improve your roller workouts without requiring much space. Heart rate monitors help you train in specific zones for targeted fitness improvements. These devices connect wirelessly to your watch or phone.
Speed and cadence sensors provide valuable data about your performance. Understanding these metrics helps structure effective workouts. Most sensors attach easily to your bike and connect to training apps.
Sweat guards protect your bike’s frame and components from corrosive perspiration. These lightweight covers fit under your handlebars and catch drips before they reach your bike. They’re easy to wash and barely add any storage space.
Phone or tablet mounts keep devices at eye level during workouts. This positioning is more comfortable than looking down and helps maintain better posture. Choose stable mounts designed for the vibration of indoor cycling.
Proper cycling attire makes workouts more comfortable. Padded shorts reduce pressure points during longer sessions. Moisture-wicking jerseys help manage sweat. However, you can start with regular athletic wear and upgrade gradually.
Troubleshooting Common Issues
Even with proper setup, you may encounter occasional challenges. If your bike feels unstable, check that the rollers are level and the spacing is correct. Adjust tire pressure and ensure both wheels spin freely.
Excessive noise usually indicates a need for maintenance. Check for debris caught in the rollers or worn drive belts. Ensure all fasteners are tight and components are properly lubricated.
If you’re struggling to balance, verify that you’re looking forward and maintaining steady pedaling. Sometimes fatigue affects balance, so take breaks as needed. Consider using support points until your skills improve.
Boredom during workouts signals a need for variety. Change your entertainment options, try different training apps, or adjust your workout structure. Even altering the room’s lighting can refresh your training environment.
Discomfort on the bike might indicate fit issues rather than problems with the rollers. Evaluate your bike’s saddle height, handlebar position, and overall fit. Small adjustments can significantly improve comfort.
Conclusion
Setting up indoor cycling rollers in a small home gym is entirely achievable with proper planning and execution. Understanding your space constraints and choosing appropriate equipment creates a foundation for successful training. Rollers offer unique advantages for compact areas, combining effectiveness with portability and storage convenience.
The initial learning curve may seem challenging, but most cyclists quickly adapt and appreciate the bike handling benefits rollers provide. Creating a proper cycling workout setup involves more than just placing equipment in a room. It requires attention to ventilation, flooring, storage, and safety considerations.
When weighing the roller trainer vs turbo trainer decision, consider your priorities regarding space, budget, and training goals. Rollers excel in small environments while developing real-world cycling skills. Regular maintenance and safe practices ensure years of productive indoor training.
By following these guidelines and remaining patient with the learning process, you can transform even the smallest space into an effective training environment. Your commitment to proper setup and technique will pay dividends in improved fitness and cycling performance, regardless of weather or outdoor conditions.
Frequently Asked Questions
How much space do I really need for indoor cycling rollers?
You need approximately six to seven feet of length and about six to seven feet of width to safely use rollers. This includes clearance on both sides for dismounting and wobbling during the learning phase. Ceiling height should be at least seven and a half feet for most riders. Measure your available space carefully before purchasing to ensure adequate room for comfortable and safe training.
Are rollers or turbo trainers better for small apartments?
Rollers are generally better for small apartments because they fold compactly for storage and are lighter to move. They’re also quieter than most turbo trainers, which matters in multi-unit buildings. However, turbo trainers are easier to use if space exists for semi-permanent setup. Consider your storage options and noise concerns when making this decision.
How long does it take to learn to ride rollers without falling?
Most people achieve basic proficiency within three to five practice sessions. Complete confidence usually develops over two to three weeks of regular use. Starting with support nearby and practicing for short periods accelerates learning. Everyone progresses at different rates, so be patient with yourself during the initial learning phase.
Can I use my road bike and mountain bike on the same rollers?
Yes, most adjustable rollers accommodate different wheelbase lengths, allowing you to use both bike types. You’ll need to adjust the roller spacing when switching between bikes. Ensure your mountain bike tires are suitable for indoor use and properly inflated. Some cyclists keep slick tires specifically for indoor training to reduce noise and tire wear.
What’s the best way to store rollers when not using them?
Fold the rollers according to manufacturer instructions and store them upright against a wall or under a bed. Wall-mounted brackets work well for keeping them completely off the floor. Always store rollers in a dry location to prevent rust. Keep them away from extreme temperatures that could affect the materials. A storage bag or cover protects them from dust when stored in garages or basements.
Related Topics:
10 Essential Bike Accessories Every Rider Needs in 2025: Gear Up for Safer, Smarter Rides
How Bike Brakes Work: The Ultimate Guide to Understanding Bicycle Braking Systems


