
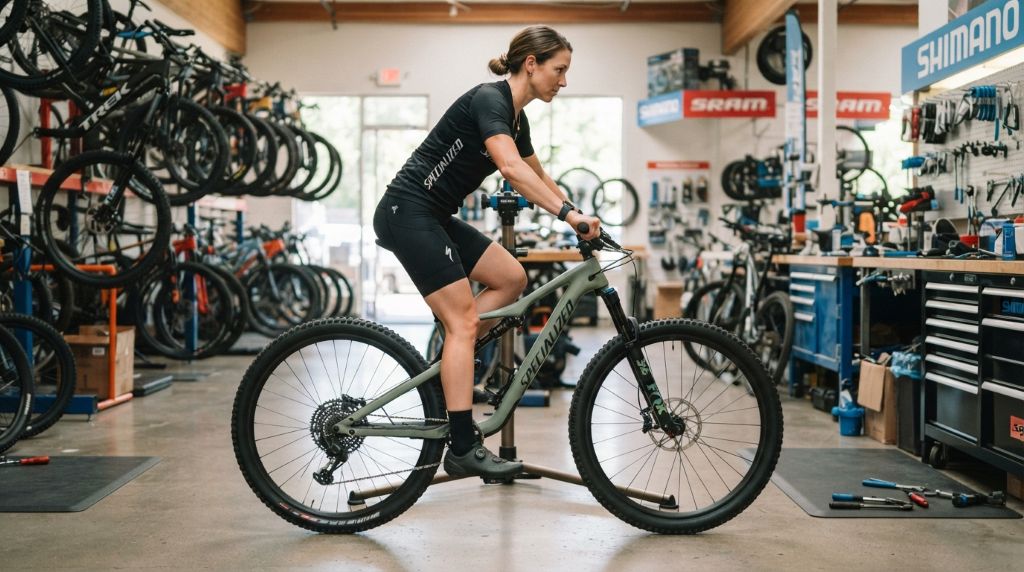
My first mountain bike was a size too big for me. I thought the extra room would be more comfortable, but I quickly realized my mistake. The bike felt unwieldy on tight trails, and I struggled to maintain control on descents. After switching to a properly sized frame, my confidence and performance improved dramatically. That experience taught me that choosing the right mountain bike frame size is one of the most important decisions you can make as a rider.
The right frame size affects your comfort, control, and efficiency on the trail. A bike that fits well allows you to ride longer with less fatigue. It also gives you better handling, which is crucial for navigating technical terrain. For me, finding the perfect fit transformed my riding from a struggle to a joy. The good news is that sizing a mountain bike frame is simpler than it seems, and a little knowledge can help you make the right choice.
Why Choosing the Right Mountain Bike Frame Size Matters
A properly sized mountain bike frame ensures a comfortable and efficient riding position. When your bike fits well, you can maintain better posture, which reduces strain on your back, shoulders, and wrists. This is especially important on long rides, where discomfort can turn an enjoyable outing into a painful ordeal. A bike that is too large or too small can cause aches and pains that make you want to cut your ride short.
Control is another critical factor. A bike that is too big can feel sluggish and difficult to maneuver, especially on tight singletrack or technical descents. On the other hand, a bike that is too small can feel twitchy and unstable, making it harder to maintain a smooth line. The right frame size gives you the balance and stability you need to ride with confidence, no matter the terrain.
Efficiency also improves with the right fit. When your bike is sized correctly, you can transfer power more effectively with each pedal stroke. This means less wasted energy and more speed. For me, switching to a properly sized frame made climbing easier and descending more controlled. It also reduced the fatigue I felt after long rides, allowing me to enjoy the trail more.
Understanding Mountain Bike Frame Size Measurements
Mountain bike frames are typically sized in one of two ways: by a general size label like Small, Medium, Large, or Extra Large, or by a specific measurement in centimeters. The size usually refers to the length of the seat tube, which runs from the bottom bracket to the top of the seat tube. However, modern mountain bikes often have sloping top tubes, which means the seat tube length is not always the best indicator of fit.
Inseam length is one of the most important measurements to consider. Your inseam is the distance from your crotch to the floor, and it helps determine the standover height of your bike. Standover height is the distance from the ground to the top tube of the bike when you are straddling it. You should have at least a couple of inches of clearance between your crotch and the top tube for safety and comfort.
Another key measurement is reach, which is the horizontal distance from the bottom bracket to the top of the head tube. This affects how stretched out you feel on the bike. Stack is the vertical distance from the bottom bracket to the top of the head tube, and it influences your riding position. Different types of mountain bikes have different geometry. Cross-country bikes tend to have a more upright position, while downhill bikes have a longer, lower stance for stability at high speeds.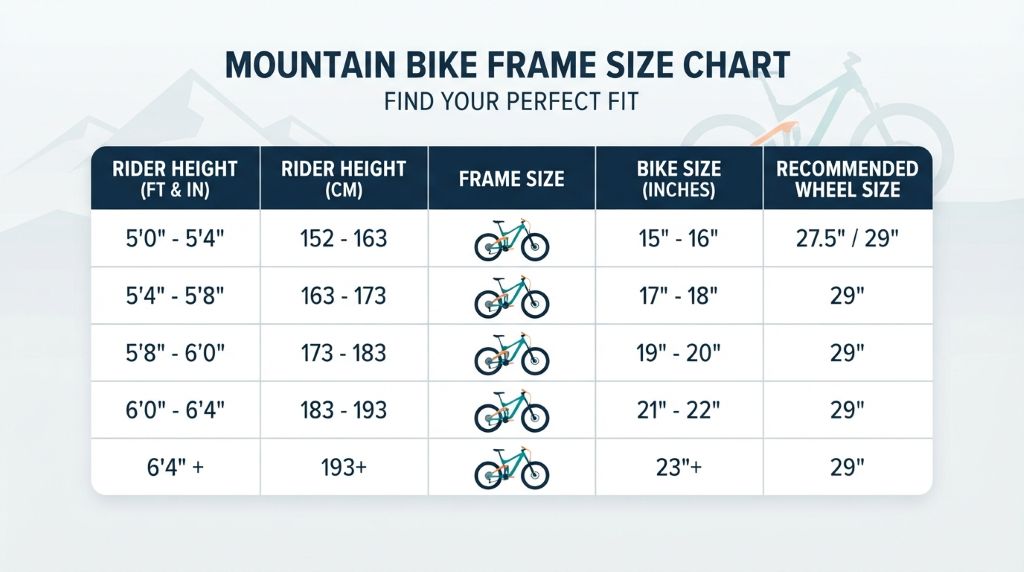
Note: Mountain bike sizing varies by manufacturer, frame geometry, and riding style. Rider height is a useful starting point, but inseam length and the manufacturer’s specific size chart should also be considered.
Step-by-Step Guide to Finding Your Perfect Fit
Start by measuring your inseam. Stand barefoot with your back against a wall and place a book between your legs, pressing it firmly against your crotch. Measure the distance from the top of the book to the floor. This gives you your inseam length. Most bike manufacturers provide size charts that correlate inseam length with frame size. Use these charts as a starting point, but remember that they are just guidelines.
Next, consider your riding style. If you ride mostly cross-country trails, you might prefer a bike with a slightly more upright position. For downhill or enduro riding, a longer, lower frame can provide more stability. Think about the type of terrain you ride most often and choose a frame that matches your needs.
Then, check the standover height. When you straddle the bike, you should be able to stand flat-footed with a couple of inches of clearance. This ensures you can safely stop and dismount. If you cannot stand over the bike comfortably, it is likely too large. For me, testing the standover height was a quick way to narrow down my options when shopping for a new bike.
Finally, consider the reach and stack. These measurements affect how you feel on the bike. A longer reach can give you a more aggressive, forward-leaning position, while a shorter reach can provide a more upright, relaxed ride. Stack height influences how high or low your handlebars are. Adjusting the stem and handlebars can fine-tune your fit, but starting with the right frame size is crucial.
Common Mistakes to Avoid When Sizing a Mountain Bike
One of the most common mistakes is relying solely on height to determine frame size. Height is a good starting point, but it does not account for differences in inseam length or torso proportions. Two people of the same height can have very different body measurements, which means they may need different frame sizes. Always consider your inseam and reach when choosing a bike.
Another mistake is ignoring the type of riding you do. A bike that is perfect for cross-country riding might not be the best choice for downhill or enduro. Different styles of mountain biking require different frame geometries. For example, a downhill bike has a longer, lower frame for stability at high speeds, while a cross-country bike has a more upright position for efficiency on climbs.
Many riders also make the mistake of buying a bike without test-riding it first. Even if a bike looks like the right size on paper, it might not feel right when you ride it. A test ride can help you determine if the frame size is comfortable and if the handling feels natural. For me, test-riding several bikes helped me find the one that felt just right.
Finally, do not assume that all brands size their bikes the same way. Different manufacturers have different sizing standards, so a Medium frame from one brand might fit differently than a Medium from another. Always check the specific size chart for the brand you are considering, and do not be afraid to try different sizes to find the best fit.
How to Test and Fine-Tune Your Bike Fit
Once you have a bike that seems like the right size, take it for a test ride. Start on a flat, smooth surface to get a feel for the bike. Pay attention to how comfortable you feel in the riding position. Your arms should have a slight bend at the elbows, and your knees should not be overly bent at the bottom of the pedal stroke. If you feel too stretched out or too cramped, the frame size might not be right for you.
Next, test the bike on a variety of terrain. Ride on climbs, descents, and tight turns to see how the bike handles. If the bike feels unstable or difficult to control, it might be too large or too small. If it feels twitchy or nervous, the frame might be too small. For me, testing the bike on different types of trails helped me confirm that I had chosen the right size.
After your test ride, fine-tune your fit with a few simple adjustments. Start with the saddle height. When you are seated with one pedal at the bottom of the stroke, your leg should have a slight bend at the knee. Adjust the saddle forward or backward to achieve a comfortable pedaling position. Then, adjust the handlebars. You can change the stem length or add spacers to fine-tune the reach and height. If you are still choosing a bike, learning how to find the best budget mountain bike without compromising quality can also help you prioritize fit, comfort, and essential features before buying.
Finally, consider the width of your handlebars. Wider bars can provide more stability and control, especially on technical trails. However, bars that are too wide can feel awkward and uncomfortable. Experiment with different widths to find what feels best for you. For me, dialing in these small adjustments made a big difference in my comfort and control on the trail.
FAQs
How do I measure my inseam for a mountain bike?
Stand barefoot with your back against a wall. Place a book between your legs, pressing it firmly against your crotch. Measure the distance from the top of the book to the floor to get your inseam length.
What if I am between sizes for a mountain bike frame?
If you are between sizes, consider your riding style and personal preference. A slightly larger frame can offer more stability, while a slightly smaller frame can provide better maneuverability. Test-ride both sizes if possible.
How does mountain bike frame size affect handling?
A larger frame can feel more stable at high speeds but may be less maneuverable on tight trails. A smaller frame can feel more nimble but may be less stable. The right size gives you a balance of control and comfort.
Should I size up or down for a mountain bike?
If you are unsure, it is often better to size down slightly. A smaller frame can be more maneuverable and easier to control, especially for beginner and intermediate riders. However, always test-ride to confirm.
Can I adjust my bike fit if the frame size is not perfect?
Yes, you can fine-tune your fit with adjustments to the saddle, handlebars, and stem. However, these adjustments have limits. Starting with the right frame size is always the best approach for comfort and performance.
Conclusion
Sizing a mountain bike frame is a crucial step in finding a bike that is comfortable, efficient, and fun to ride. The right fit can transform your cycling experience, making every ride more enjoyable. While the process might seem daunting at first, breaking it down into simple steps can help you find the perfect size.
Do not rush the process. Take your time to measure, test-ride, and fine-tune your fit. If you have your own tips or experiences with sizing a mountain bike, share them in the comments below. Your insights could help another rider find their perfect fit. Happy trails!